TC Flex 2.0 software offers a higher degree of personalization & customization to projects and the various URC Graphical User Interfaces (GUI's).
When you build your graphics at Reference Resolution, you can add them to the Gallery for easy drag-and-drop placement. The images will scale to the same relative size on any of the simulators, which allows you to use the same graphics set across all devices.
This article details how to create graphics using the Reference Resolution in TC Flex 2.0
Flex 2.0 Reference Resolutions for UI's
As for the screen resolution, this gets a little complicated to explain, but it actually is split into various sections:
Flex 2.0 uses several different simulators currently.
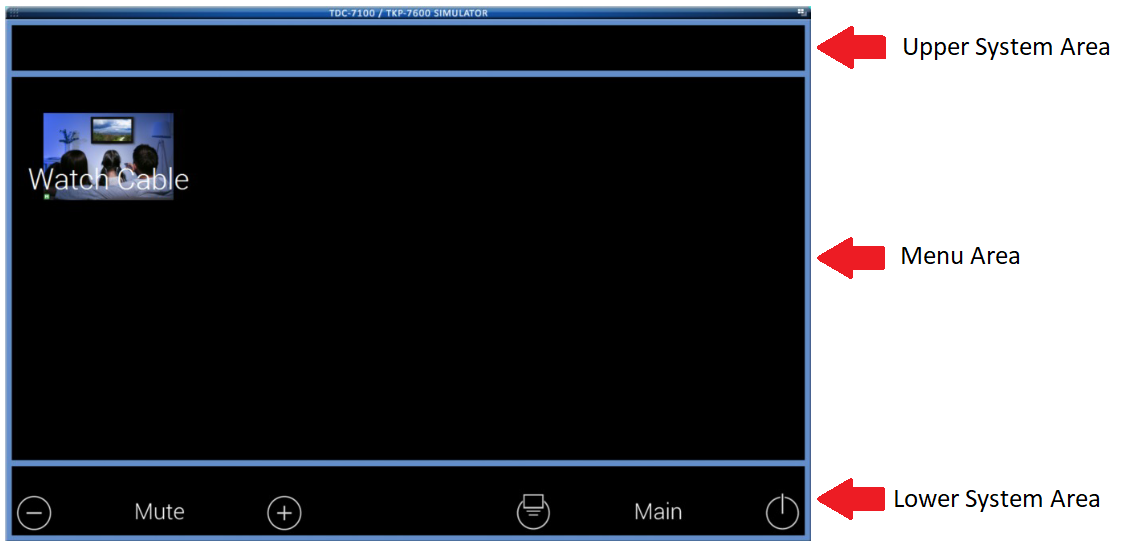
On each, the screen is split into Upper System Area, Menu Area, and Lower System Area sections.
Here are the dimensions for each of these:
| LANDSCAPE MODE | Upper System Area (Top Bar) | Menu Area | Lower System Area (Bottom Bar) |
|---|---|---|---|
| TKP-5600 | 960x55 | 960x402 | 960x83 |
| TKP-7600/TKP-9600 | 1280x73 | 1280x616 | 1280x111 |
| TDC-7100/TDC-9100 | 1280x73 | 1280x616 | 1280x111 |
| Android/iOS Devices | 1024x59 | 1024x452 | 1024x89 |
| PORTRAIT MODE | Upper System Area (Top Bar) | Menu Area | Lower System Area (Bottom Bar) |
|---|---|---|---|
| TKP-5600 | 540x55 | 540x822 | 540x83 |
| TKP-7600/TKP-9600 | 800x73 | 800x1096 | 800x111 |
| Android/iOS Devices | 600x59 | 600x876 | 600x89 |
You can create graphics for these specific resolutions, which will give you precise pixel-level control of your UI, but doing so will also require that you build the graphics and layouts separately for each device and orientation.
However, you can save this extra work by creating graphics for what URC calls the “Reference Resolution.” The Reference Resolution for TC Flex 2.0 is 4096x2400, which breaks down to:
| LANDSCAPE MODE | Upper System Area (Top Bar) | Menu Area | Lower System Area (Bottom Bar) |
|---|---|---|---|
| Reference | 4096x236 | 4096x1808 | 4096x356 |
| PORTRAIT MODE | Upper System Area (Top Bar) | Menu Area | Lower System Area (Bottom Bar) |
|---|---|---|---|
| Reference | 2400x236 | 2400x3504 | 2400x356 |
When you build your graphics at Reference Resolution, you can add them to the Gallery for easy drag-and-drop placement. The images will scale to the same relative size on any of the simulators, which allows you to use the same graphics set across all devices. When building graphics for Reference Resolution, try not to use any lines or spacing smaller than 4 pixels, because when the graphics get scaled down to TKP-5600 or low resolution mobile devices, some details might get lost in the scaling.
Finally, in TC Flex 2.0 Main Menu buttons work just like any other button. So yes, you can create them at any size you like.
Buttons & graphics can be added to all three (3) sections available:
● Upper System Area: Outside of the system buttons, any button can be added and programmed.
● Menu Area: Almost any button can be placed in this available space.
● Lower System Area: Outside of the system buttons, any button can be added and programmed.
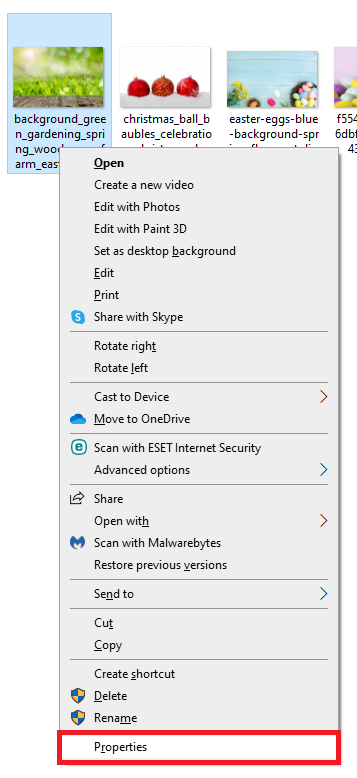
Determining an Image Dimensions & Bit Depth
To determine an image dimensions and/or bit depth, do the following in Windows:
1. Locate your desired image.
2. Right-click on the image and select "Properties" (as shown below):
3. Select the "Details" tab to view the image details (as shown below):
This process allows you to determine if the image is suitable for use as a background image.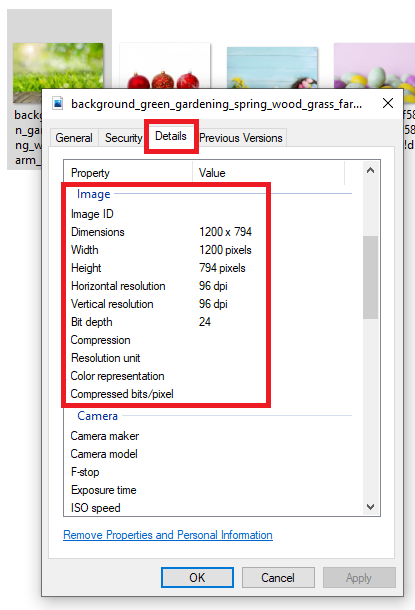
Additional Information & Resources:
Please refer to the article Programming:URC Accelerator vs. TC Flex for additional information on the differences between Accelerator & TC Flex.
Please refer to the article on TC Flex Background-and-Button Graphics & Scaling for additional information for graphics and resolution for the various URC user interfaces.
To learn more about TC Flex configuration and programming, please download the TC Flex Programming Guide.
