Specific URC devices connected to advanced networking gear can sometimes cause issues when discovering and/or downloading during the programming process.
If you are having issues discovering a device from within Step 6b: URC Devices, or the device is failing to download, it is possible the network port on the URC device requires manual configuration.
URC Accelerator 3 software provides a new option for configuring the Ethernet port connection configuration for specified URC devices.
This article details the steps when Manually Configuring the Advanced Settings for Gigabit Ethernet-enabled URC Devices inside the Accelerator 3 software.
Gigabit Ethernet-enabled Devices
Many URC devices are Gigabit Ethernet-enabled. Generally, these are URC devices newer that 2018.
The table below lists the URC devices that allow for Advanced Settings.
| URC Device | Ethernet Port Type | Advanced Settings? | Notes |
|---|---|---|---|
| MRX-5 | 10/100 | No | |
| MRX-10 | 10/100 | No | |
| MRX-12 | 10/100/1000 (Gigabit) | Yes | |
| MRX-15 | 10/100/1000 (Gigabit) | Yes | |
| MRX-30 | 10/100/1000 (Gigabit) | Yes | |
| TKP-8600 | 10/100/1000 (Gigabit) | No | PoE+, 10/100/1000 Gigabit port |
| TKP-9600 | 10/100/1000 (Gigabit) | Yes | PoE+, 10/100/1000 Gigabit port |
| TDC-9100 | 10/100/1000 (Gigabit) | Yes | PoE+, 10/100/1000 Gigabit port |
| HDA-SW5 | 10/100/1000 (Gigabit) | No | Gigabit-enabled port is required |
| HDA-130 | 10/100/1000 (Gigabit) | No | Gigabit-enabled port is required |
| HDA-1600 | 10/100/1000 (Gigabit) | No | Gigabit-enabled port is required |
| HDA-4100 | 10/100/1000 (Gigabit) | No | Gigabit-enabled port is required |
| HDA-8100 | 10/100/1000 (Gigabit) | No | Gigabit-enabled port is required |
| HDA-IO | 10/100/1000 (Gigabit) | No | Gigabit-enabled port is required |
Manually Configuring the Advanced Settings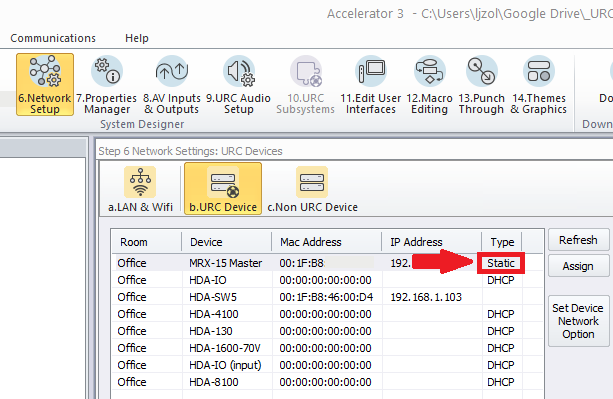
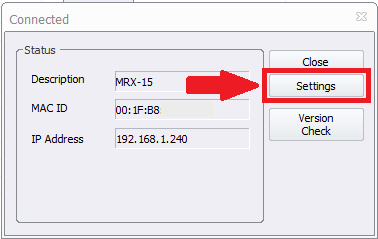
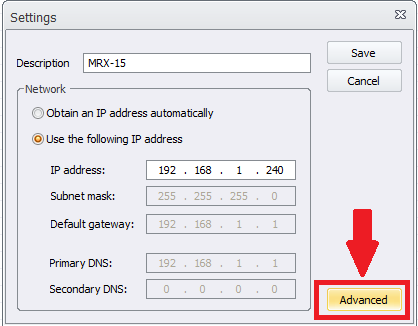
3. After you click the Settings button, a new window will open displaying the Settings options. Click the Advanced button to proceed as shown below.
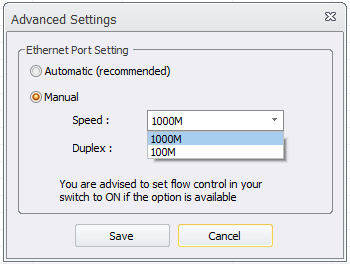
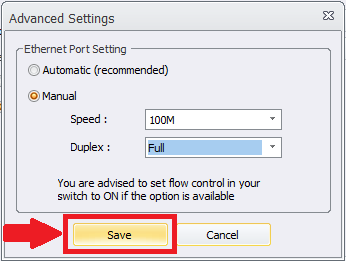
4. The Advanced Settings window will appear. You will now have the options available for that device. Automatic (recommended) will work in many situations. However, depending upon the network switch or network switch settings, you now can select Manual and choose your desired settings.
Speed: The choices are 100M or 1000M
100M refers to 100Mbps (Megabits per second) and is often referred to as “Fast Ethernet”
1000M refers to 1000Mbps (Megabits per second) and is often referred to as “Gigabit Ethernet”
Duplex: The choices are Full or Half.
In most cases, this should be set to Full.
Full-Duplex is a mode of communication in which data is simultaneously transmitted and received between stations. Full-duplex communication is twice as fast as half-duplex communication, and typically uses two separate pairs of wires for supporting simultaneous transmission and reception by a host.
Note: This setting applies only when using the 100M speed option.

5. After making the desired changes, click on the Save button to save and apply your changes. The device may take a moment to apply the changes.
Additional Information & Resources:
To learn more about Accelerator 3 configuration and programming, please see the Accelerator 3 online Programming Guide.
