The following article helps to give you a better understanding when Adjusting HDA Input Levels on various HDA devices and details the procedure for configuring the HDA Input Level settings when using Accelerator 3 software and TC Flex 2 software.
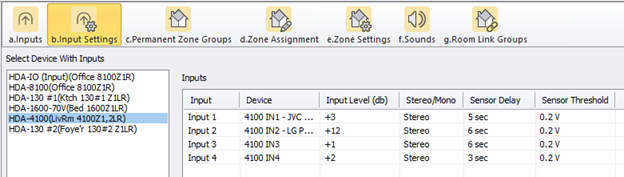
HDA Input Levels are set in Accelerator Step 9b, and TC-Flex 2.0 Step 7b.
A common misunderstanding is the purpose and function of the Input Level adjustment for HDA devices. First things first, input sensitivity is not a volume control! Setting input sensitivity maximizes the signal to noise ratio by matching the input sensitivity to the output voltage on the preceding source, which may be a head unit, DSP, or integration product. Maximizing the input voltage strength by balancing its proportion to the source unit should ensure maximum output potential with minimal clipping and/or distortion at most volume levels. An HDA audio system with properly set Input Levels should be loud, dynamic, and free of distortion.
Input Level is adjustable within an HDA product since the signal strength varies from input source to input source. If the input signal strength is too low the HDA amplifier most likely will not reach its maximum output. Increasing the input level ensures the amplifier now can produce its maximum, non-clipped output potential. Likewise, if the input level is set too high the amplifier output will sound distorted and clipped. If the input level is not lowered on a higher voltage input signal there is a strong risk of clipping and distortion.
Input Level Adjustments
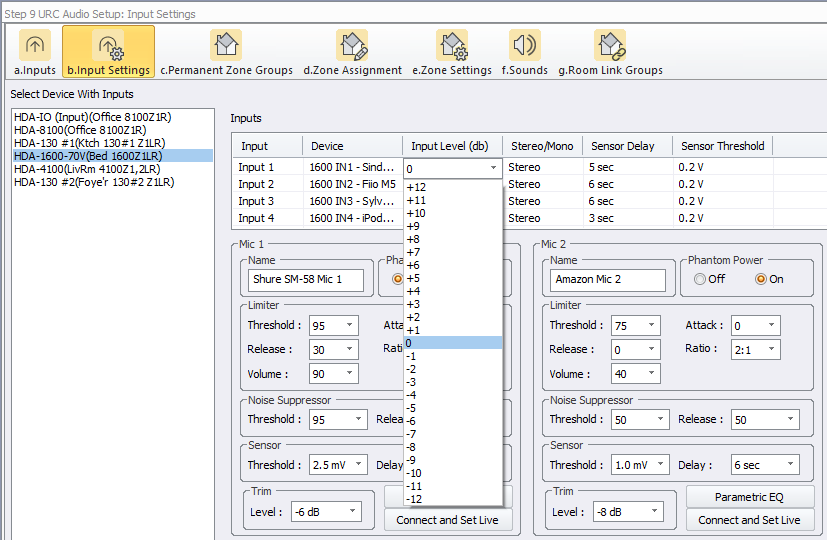
Setting the input level (sensitivity) maximizes the signal to noise ratio by matching the input sensitivity to the output voltage on the audio source. For analog inputs, HDA Amplifiers support a -12dB to +12dB Input Level adjustment. For digital (coax/toslink) inputs, HDA Amplifiers support a -6dB to +6dB Input Level adjustment.
If the input level setting is too low the amplifier most likely won’t reach it’s maximum output at any point on the volume scale.
Input level settings are not a volume control! If the input level setting is too high there is a strong risk of clipping and distortion, regardless of the zone’s volume setting.
An HDA Input Level setting adjustment should not be used to try and match the HDA Volume Curve response to the DMS Volume Curve response at lower volume levels. This will result in clipping and distortion:
HDA Amplifiers and HDA-IO Input Levels are set to a default value of -3dB. During the beta test for HDA, some popular audio sources (Sonos and Heos) were outputting a high line level audio output, and determined that this would be a great common starting point default (-3dB).
As a starting point when setting your HDA Input Levels, a Sonos Connect player’s fixed analog outputs typically output 2.1Vrms. Users in the field are setting their HDA Input Level for this device between -5dB and -3dB.
A Heos Link analog audio output is 2.0Vrms. When using Heos with HDA, the Input Level for the HDA is typically being set at -5dB.
Devices like Cable TV STBs are being set to a higher HDA Input Level, between +3dB and +6dB.
RCA, Digital Coax/Toslink and Balanced Analog Input Levels
The default input level setting for RCA and Balanced Analog Inputs is set to a low value, -3dB. This is due to what is commonly connected to an HDA unit. Audio media streaming devices such as HEOS and Sonos have a high audio output level which can cause the HDA amplifier output to be distorted unless the Input Level setting for these devices is set to a lower value, like -3dB.
Cable and Satellite Set Top Boxes typically require a higher Input Level setting on the HDA unit. Roku and Apple TV devices typically perform best when set to an Input Level value near 0dB.
Microphone Input Levels
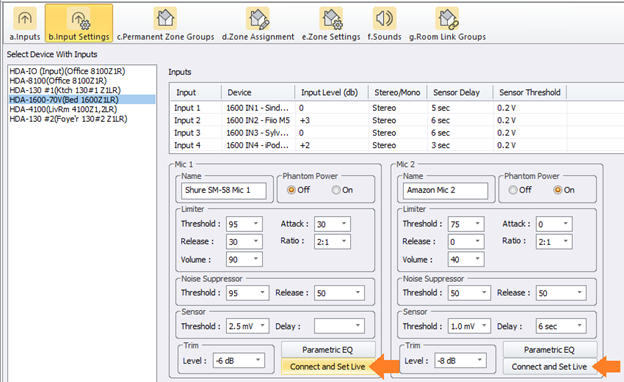
Microphones should be set that the “Peak” LED on the front panel of the HDA-1600 barely illuminates when speaking very loud into a connected microphone.
Microphone output levels vary based on the type of microphone and brand of microphone being used. Microphones that use “Phantom Power” have a higher audio output, while passive microphones like the Shure SM-58 have lower audio output, requiring a higher microphone input level setting in the HDA unit.
Output levels also vary when using a preamplifier/microphone mixer connected to an HDA-1600 Microphone input. The user manual for the preamplifier being used should be consulted when setting the microphone input levels, and whether to use the HDA-1600 microphone input or the Balanced/Unbalanced analog input.
Use Accelerator Step 9b and TC-Flex 2.0 Step 7b to adjust microphone input levels live (see picture below)
Additional Information & Resources:
Note: When attempting to adjust input levels for an HDA device, make sure that the HDA device is running firmware v1357 or higher!
To learn more about HDA products and programming, please see the HDA Programmers Guide or the Accelerator 3 online Programming Guide.
