URC HDA devices and software provide countless options to configure and optimize audio settings to achieve performance and flexibility for almost any application.
One of those features is HDA Limiters.
This article provides a better understanding when using the Limiters on various HDA devices and details the procedure for configuring the settings when using Accelerator 3 and TC Flex 2 software and URC user interfaces.
Understanding Limiters and Their Use in HDA
Before we discuss Limiters, it is important to understand what we’re actually doing to the sound.
Through the use of limiters we can make a zone's playing audio or a microphone sound as things do on the FM radio, audibly more steadier and even. There is always a trade off though. Limiters tend to squash the life out of a natural sound very easily. We must therefore use Limiters in moderation and with the appropriate settings for the audio we are processing.
A Limiter can affect the dynamics of a sound, changing the volume of the sound playing. A Limiter will stop the audio sound peaks from reaching too high of values which would otherwise result in digital clipping.
The difference between a music track or microphone dialogue's loudest and quietest moments is called the "dynamic range". This dynamic range is the main aspect of a sound that we will be affecting with a Limiter.
Each HDA Microphone Input supports a Limiter that is dedicated to that microphone input.
Each HDA Zone Output supports a Zone Limiter, referred to on the URC Interfaces as "Tone Shaping".
Steps to adjust the Tone Shaping for each zone:
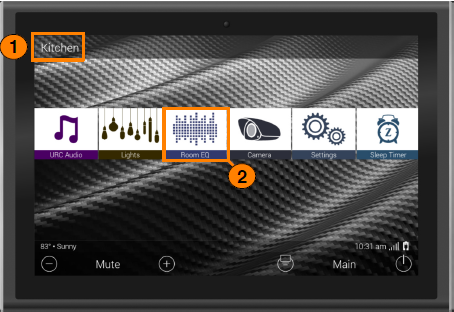
Step #1: Select the desired room or zone on the URC user interface
Step #2: Select The Room EQ module(the default location can be found in the Settings submenu)
Step #3: Select the desired Tone Shaping preset
Access the Tone Shaping Presets as shown below; Steps 1 & 2: (see image below)
Access the Tone Shaping Presets as shown below; Step #3: (see image below)
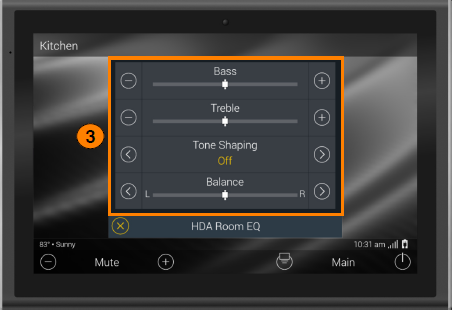
Tone Shaping: Provides the user with five (5) tone shaping presets. These presets can be used to make adjustments based on a particular setting. There are five Tone Shaping presets per zone.
Use the left and right arrows to toggle through the available Tone Shaping options. These adjustments happen in real-time. The "Custom" Tone Shaping Preset is a Limiter that allows the the installer to determine the Limiter preset settings.
Below are the available Tone Shaping Options:
- Music
- Voice
- Gaming
- Custom
- Off
What do limiters do?
A limiter limits the dynamic range of an audio source playing through the zone's speakers. The limiter serves as a ceiling which signal volume cannot pass. If the signal's volume hits this ceiling, it will be harshly compressed so that it does not pass above.
As a Limiter's compression ratio increases, so will the amount of compression. Eventually, that compression amounts to an impermeable ceiling for the audio volume level.
For example, let us say that we have a Limiter with a compression ratio of 2:1 (not very high). We send three signals through it, at levels of 2 dB, 4 dB, and 8 dB over the threshold.
With this ratio, the Limiter would output signals at levels of 1 dB, 2 dB, and 4 dB over the threshold. Closer to each other in level, but still not so consistent.
However, if we turned the ratio up to 10:1 (quite high), the compressor would output signals at approximate levels of 0.25 dB, 0.5 dB, and 1 dB over the threshold. These signals are now much closer to each other and much closer to the threshold level itself.
Eventually, as the Limiter compression ratio increases, the signal will not be allowed to cross the threshold, which becomes a sort of “ceiling.”
Limiter parameters
Threshold
Limiters will have an adjustable threshold level, which is also often referred to as the ceiling.
This sets the signal level at which the Limiter begins compressing your audio. Compression does not occur until the signal level reaches the threshold, and compression will cease once the incoming signal level drops below the threshold.
Ratio
Your ratio control lets you decide how much compression is applied once the signal crosses that threshold — the actual ratio being referred to is the input level compared with the output level. At a ratio of 2:1, for example, every 2dB of signal level over the threshold will be compressed to deliver only 1dB of signal level increase at the output stage.
Attack
The attack control on a Limiter determines how long it takes for the compressor circuit to reach (nearly) full compression — these are often very short values time-wise, sometimes down into the microsecond range. A good way to look at the attack control is that it determines how much of a sound’s initial attack will be compressed — longer attack times allow more of the initial attack to slip through before compression begins.
HDA Limiter Attack times are minimum 5 ms (milliseconds), maximum 100 ms.
if Attack Time in Accelerator is set to =< 5, actual attack time = 5ms
if Attack Time in Accelerator is set to = 6, actual attack time = 6ms
if Attack Time in Accelerator is set to = 7, actual attack time = 7ms
if Attack Time in Accelerator is set to = 8, actual attack time = 8ms
if Attack Time in Accelerator is set to = 9, actual attack time = 9ms
if Attack Time in Accelerator is set to = 10, actual attack time = 10ms
...and so on
if Attack Time in Accelerator is set to = 100, actual attack time = 100ms
Release
Similar to attack, the release control determines how long it takes compression to stop once the incoming signal level falls below the threshold. Setting this control too short can cause the compressor to “pump” or “breathe” — setting the release too long can cause equally unnatural sound effects.
HDA Limiter Release times are minimum 25ms and goes to 5 seconds.
if Release Time in Accelerator is set to = 0, actual release time = 25ms
if Release Time in Accelerator is set to = 1, actual release time = 50ms
if Release Time in Accelerator is set to = 2, actual release time = 100ms
if Release Time in Accelerator is set to = 3, actual release time = 150ms
if Release Time in Accelerator is set to = 4, actual release time = 200ms
if Release Time in Accelerator is set to = 5, actual release time = 250ms
if Release Time in Accelerator is set to = 6, actual release time = 300ms
if Release Time in Accelerator is set to = 7, actual release time = 350ms
if Release Time in Accelerator is set to = 8, actual release time = 400ms
if Release Time in Accelerator is set to = 9, actual release time = 450ms
if Release Time in Accelerator is set to = 10, actual release time = 500ms
...and so on
if Release Time in Accelerator is set to = 100, release time = 5000ms
Level (Makeup Gain)
Because Limiter compression essentially lowers the volume of your audio in a dynamic, intelligent way, you may need to apply some makeup gain to bring the signal level back up after compression occurs. Use the output level or gain control on your compressor in conjunction with its bypass button to quickly compare and match the level of your compressed audio to the incoming signal.
So Where Do I Start?
Regardless of what type of audio signal you’re applying a Limiter to, it will be helpful to have a go-to starting point with any Limiter. With the controls set as explained below, you’ll be in a good position to tackle any task with a Limiter.
Threshold
Start with this turned all the way up (set to 100 in Accelerator). By doing this, you’ll be able to gradually introduce compression by lowering the threshold, which will better help you hear the effect it’s having on your audio.
When testing a Limiter with a Microphone, use the "Connect and Set live" option in Accelerator, Step 9b for an HDA-1600.
When testing the preset "Tone Shaping" limiters for a zone, along with setting the "Custom" Tone Shaping Limiter for a zone, use the "Connect To Zone" option in Accelerator, Step 9e.
Attack/Release
There is a lot of nuance in these controls; a good place to start would be "50" for both of them.
Ratio
Start with a moderate setting of 2:1. You can always increase or decrease this after you have gotten the threshold and attack/release controls dialed in.
Level (Makeup Gain)
Start with this at "0" (no boost or cut). Increase this setting as desired to increase the audio output level for the selected source at the zone's speakers.
HDA Uses "Soft Knee" Compression
A soft knee setting applies the compression gradually until the full ratio is reached. This makes the transition from uncompressed to compressed audio smoother and less abrupt. Also, soft knee settings do not wait until the threshold has been crossed to apply compression. Instead, the compressor gradually applies compression to the audio signal as it approaches the threshold and does not reach the full ratio amount until somewhere past the threshold.
Additional Information & Resources:
Please refer to this article for additional details on using the HDA Tone Shaping Presets.
To learn more about HDA products and programming, please see the HDA Programmers Guide, the HDA Modules Users Guide, or the Accelerator 3 online Programming Guide.
