This article details the steps to convert a Master System Controller (MSC) to another type of Master System Controller, or to relocate the MSC to another room/zone in the project. An example of using this feature would be for a customer who would like to upgrade an MRX-8 to an MRX-15 or MRX-30. Converting the file mitigates the installer from having to re-write the program.
To Convert a File to a Different Master System Controller:
- Open the file to be converted.
Pro Tip: It is recommended to perform a "File Save-As" to preserve the original file if ever needed again.
Pro Tip: You will need to add the new controller to the project prior to performing the convert process.
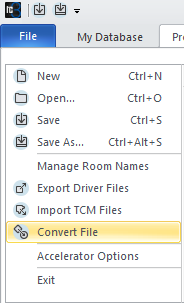
- Select the File tab.
- Select the Convert File option.
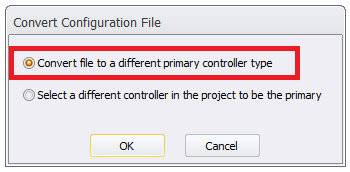
- Select Option 1. "Convert File to a different primary controller type".
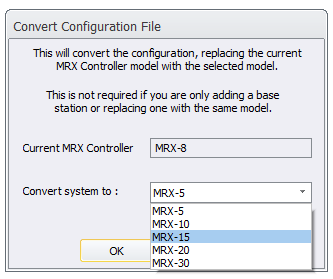
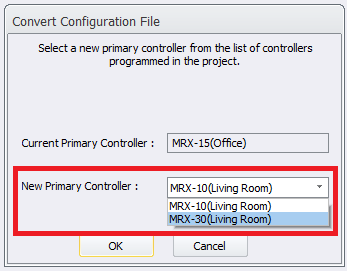
- Select the new Primary Controller to convert the file to from the drop-down list.
6. Be sure to review all IR and RS-232 outputs in Step 5: Base Station Setup, especially if converting to a base station with fewer outputs/ports. Also, be sure to re-accelerate in Steps #11 & Step #12 after the conversion.
The software will alert you as shown in the warning below:

To Relocate a Master System Controller to a Different Room/Zone:
Pro Tip: It is recommended to perform a "File Save-As" to preserve the original file if ever needed again.
- Open the file to be modified.
- To relocate a Master system controller to a different room in the project, first add another MRX device from Step 3: URC Devices to the desired room. The example below shows a MRX-30 added to the Living Room as this shall be the NEW room location for the Master System Controller.

- Select the File tab.
- Select the Convert File option.
- Select Option 2: "Select a different controller in the project to be the primary".
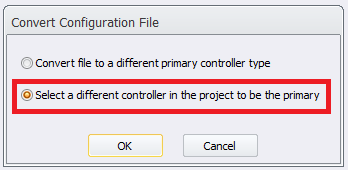
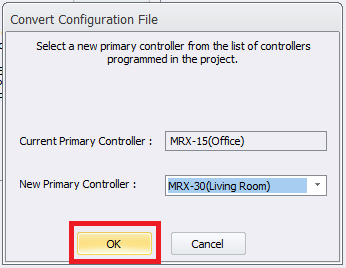
- Select the MRX unit in the new room from the drop-down list to be the "New Primary Controller".
5. Click the "OK" button to complete the process.
Note: Be sure to download the file to the ENTIRE system to apply the MRX change.
Additional Information & Resources:
Please refer to this article for the process for converting system files when using Accelerator 1 or 2.
To learn more about Accelerator 3 configuration and programming, please see the Accelerator 3 online Programming Guide.
