The following article details the Accelerator 3 software step-by-step process for creating a URC Amp Ducking Event and using it as a Audio Override when using URC HDA audio.
This example shows how to use a turntable to automatically override the existing audio source. This same process can also be used when creating an HDA audio override event for a jukebox, a microphone or any other similar audio device.
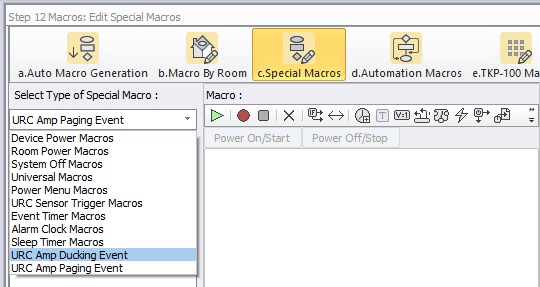
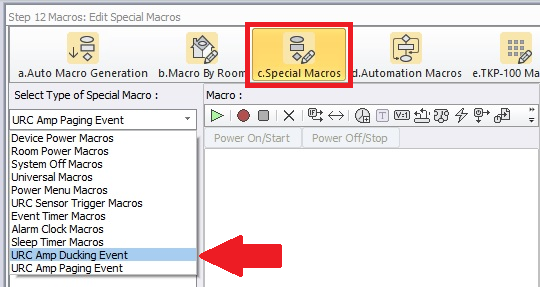
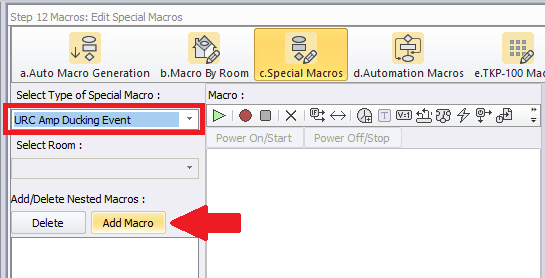
Location of Ducking Event in Accelerator 3 software - Step 12c
Ducking Events:
- An HDA Ducking Event is essentially a Macro programmed in Accelerator that allows the playing of two inputs in a zone.
- One input or sound file is “ducked” on top of another.
- When an input is “ducked” on top of another, the original input in the zone may have its volume reduced by a percentage.
- Setup Ducking Events in Accelerator Step 12c, TC Flex 2 Step 10 (Special Macro):
HDA Ducking Event Applications:
- 64 Ducking Events may be programmed in the system
- Use for announcements in commercial applications, blending the microphone audio into the zones while decreasing the volume of the current zone input
- Duck a pre-recorded announcement sound file into a zone playing background music, just like what you hear at an airport, or in an office setting
- Duck a pre-recorded sound effect into a zone playing a sporting event, just like sound effects heard at a sports bar when the home team scores
- Blend Two Microphone Inputs together in a zone or group of zones
Adding a Turntable Device to Your Project
1. If you don't already have one in your URC My Database, you can create a driver for the turntable by using the following procedure to add a "No Commands" device. This device will not have a user interface or require any control method (IR, IP, RS-232).
This device is required so that it can be assigned to an audio input and a sensor input.
Note: Once this device is created, you can access and use it repeatedly without the need to create a new driver each time!
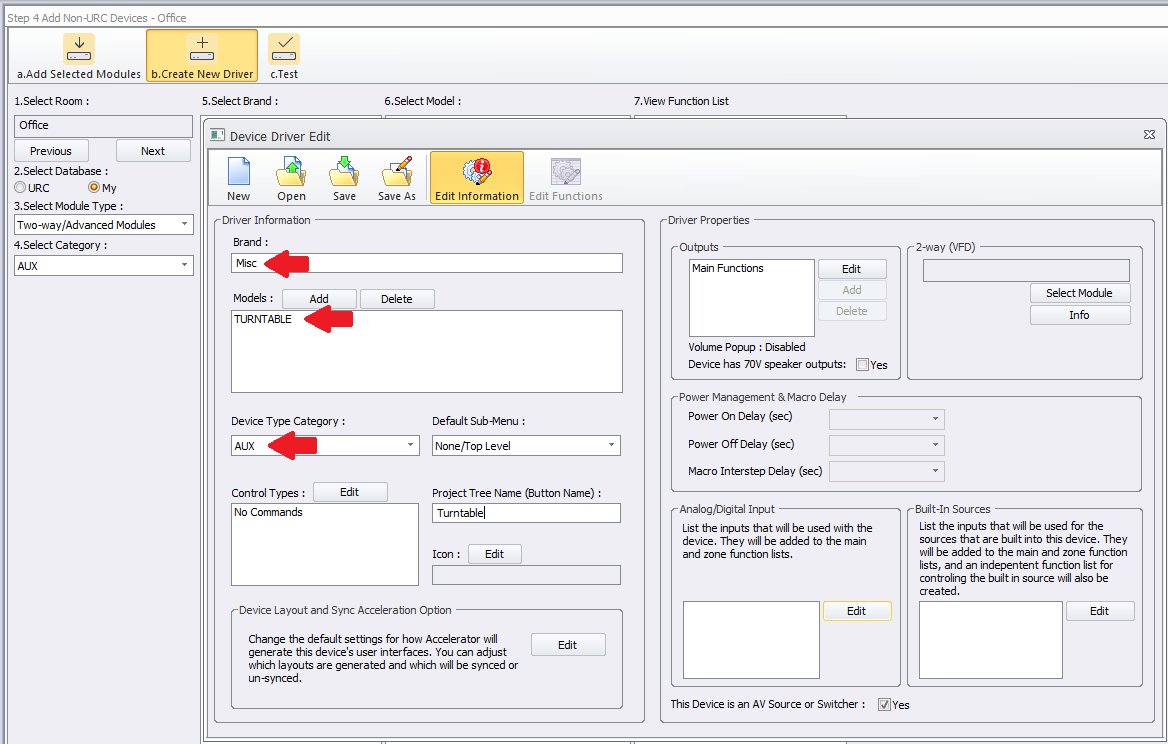
In Step #4b - Add Other Devices>Create New Driver, select "Start Blank - Device Not Found".

2. Choose the "No Commands" option. The No Commands option will allow you to add it as an audio source.
This will create a device with no control and no buttons generated anywhere. It will appear in Two-way/Advanced Modules when selecting the Module Type. Click the Next button.

3. In this example, we created the turntable as Brand: Misc, Model: TURNTABLE and Device Type Category: AUX.
We then saved the driver as "turntable.cd3" in the custom driver database (or whatever name you prefer).
The default file path is:
C:\Users\<insert_user_name>\Documents\Universal Remote Control, Inc\URC Accelerator 3\CustomDrv
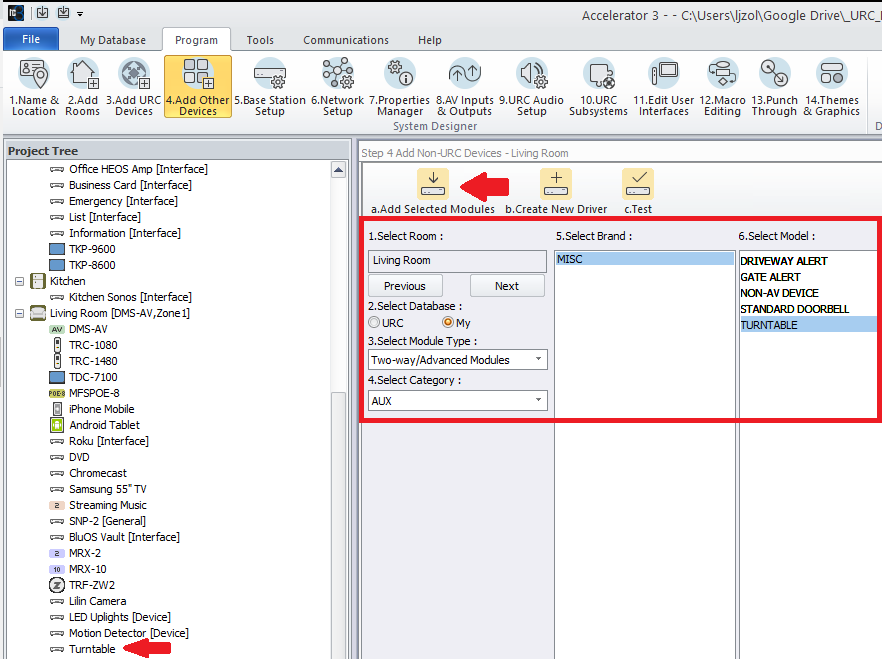
4. To locate and add the driver to your project, go to Step #4, select My under the Select Database section. Select Two-way/Advanced Modules under the Module Type and then select AUX under the Category section. It will appear in Two-way/Advanced Modules when selecting the Module Type. You will then see your devices listed and can add them to your project as required. Select Turntable.
Click the "Add Selected Modules" button to add it to your project.
Programming the Turntable Audio Override Using HDA Audio Sensing:
Step 1: The initial settings are done under Accelerator Step #5 - Base Station Setup and Step #5b - Sensors.
You will see the Turntable device listed in the Living Room after adding it to your project as detailed above.
Pro Tip: If you are using a standalone turntable, you will usually require a phono preamp to be able to plug it directly into a URC HDA amplifier or HDA-IO Input Stream Adaptor. More information and details here: https://www.audioadvice.com/videos-reviews/what-is-a-phono-preamp:
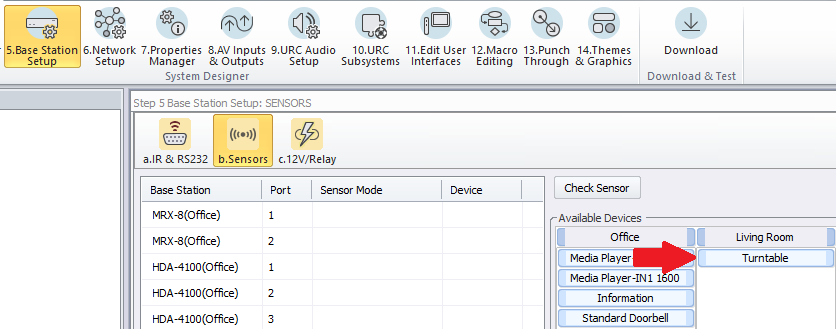
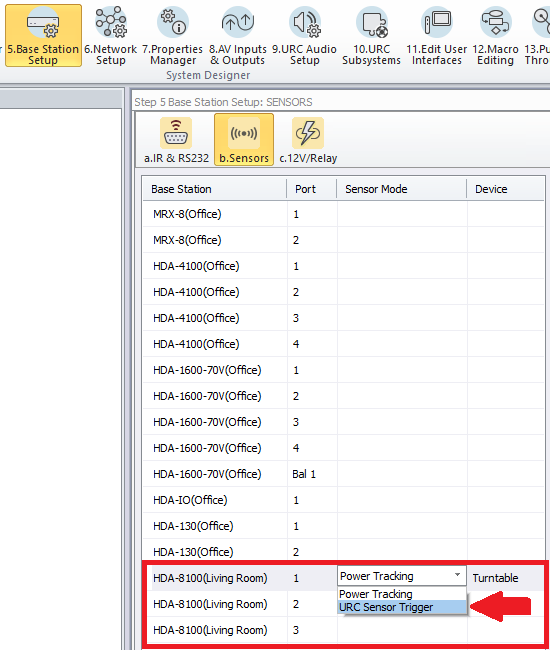
Step 2: From the list of available devices, drag over the Turntable device to the correct audio sensing port on the HDA unit and verify that URC Sensor Trigger is selected, not Power Tracking.
The example below shows using the HDA-8100, Sensor Port #1 as the desired sensor input location.
The available options for URC sensors are:
• Power Tracking (not used for this scenario)
• URC Sensor Trigger - This is the setting required when using the Turntable (audio) as the "trigger"
Step 3: In Step #9a, URC Audio Setup>Inputs, you will need to add the turntable as an audio input on the HDA-8100.
Select the HDA-8100 (Living Room) from the Select Device with Inputs section and then drag the Turntable audio device from the Living Room into the Input 1 Source section on the HDA-8100.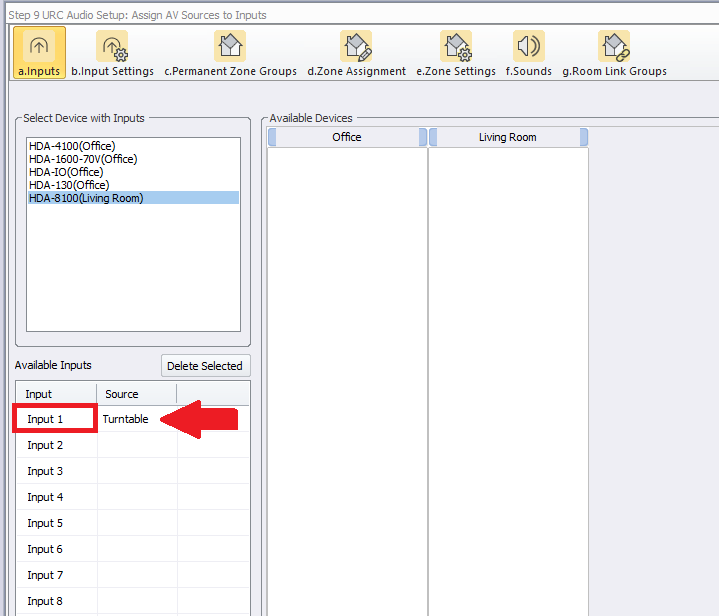
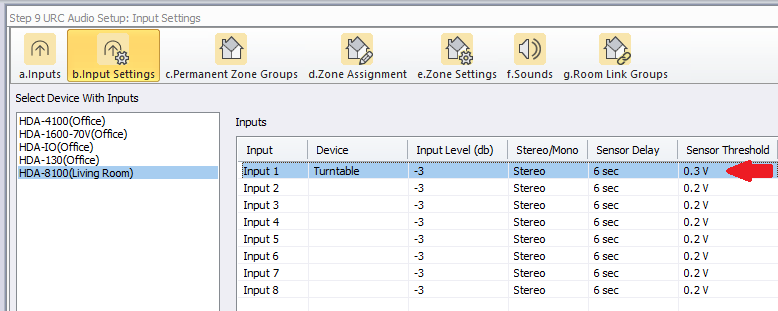
Step 4: In Step #9b, URC Audio Setup>Input Settings, we can adjust the Sensor Threshold.
The HDA-8100 has the Turntable assigned to Input 1 on the HDA-8100. We adjusted the Sensor Threshold to .3v so that it doesn’t switch back to the main music source during quiet passages. You may also need to adjust the Input Level (db) depending on the output gain of the phono preamplifier.
Step 5: After accelerating like normal in step 12a, we will now need to create the URC Amp Ducking Event that will determine the volume, zones and the other desired ducking parameters.
Go to Accelerator Step #12c, Special Macros. On the left-side pull-down menu, select URC URC Amp Ducking Event.
Step 6: Click on the Add Macro button to create the event.
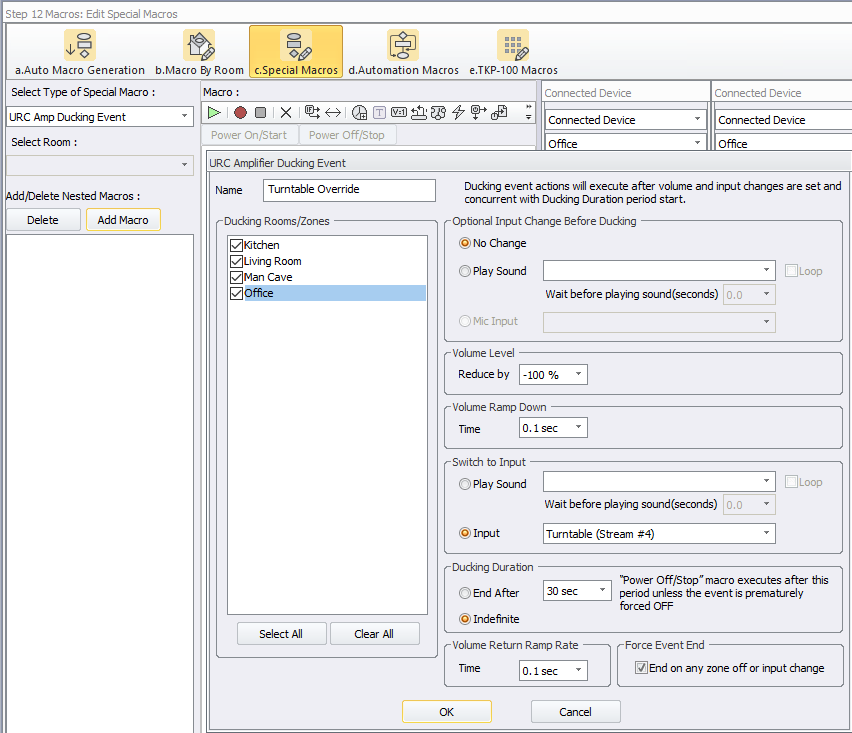
Step 7: In this example, we will call the URC Amp Ducking Event Turntable Override.
There are settings that can be adjusted as desired:
a. Ducking Rooms/Zones: Choose the rooms and zones where you want the ducking event to play.
b: Optional Input Change Before Ducking: Not used in this example.
c: Volume Level: This setting allows you to reduce the existing source volume level. We want the Volume Level (of the existing source) to reduce by 100%. We’re going to switch the input to the Turntable.
d: Volume Ramp Down: This setting determines how long it takes the volume to ramp down.
e: Switch to Input: This setting allows you to choose the specific stream input for the Turntable. In this example, the Turntable is Stream #4.
f: Ducking Duration: This setting determines how long the ducking event will last. In this example, we want the Ducking Duration to be indefinite so it will stay on the turntable until the signal goes away.
g: Volume Return Ramp Rate: This setting determines how long it takes the volume to ramp to the previous level (if applicable)
h: Force Event End: This setting forces a ducking event to end on a zone off or an input change
Click OK when all setting are completed. If you need to make a change, simply double-click on the macro to reopen it, edit it and then resave.
The newly created macro will be saved as shown below: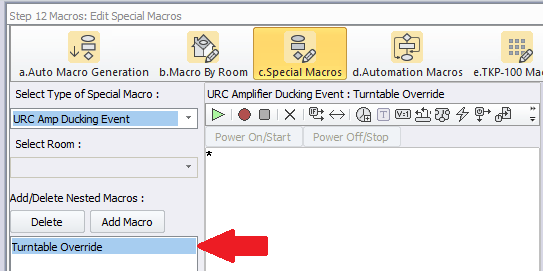
Step 8: Now that we have created the URC Amp Ducking Event, we will need to configure the HDA-8100 audio sensor trigger macro.
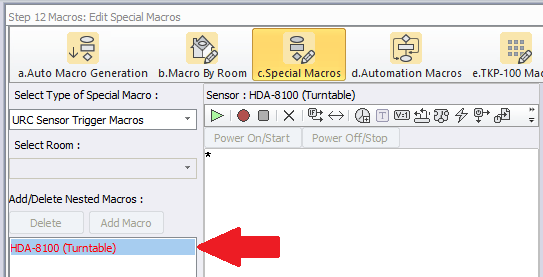
Go to Accelerator Step #12c, Special Macros. On the left-side pull-down menu, select URC Sensor Trigger Macros.

Step 9: The HDA-8100 trigger macro event will be listed in red. The red colored text means that is has not yet been programmed (as shown below):
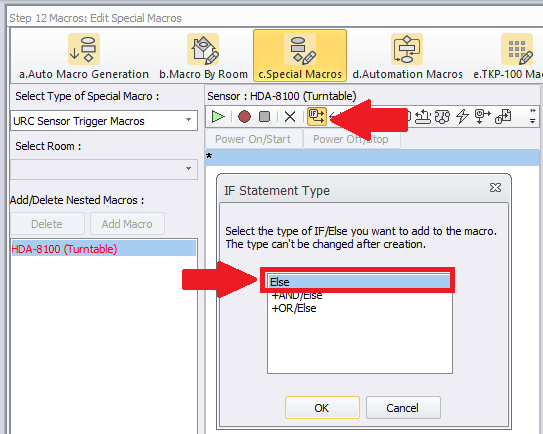
Step 10: In the main macro window, click on the asterisk (*) and then select the IF Statement Type button and then select the "Else" option.
Step 11: After selecting "Else", the IF Setting window will pop up asking you to select the Type of action/trigger desired. Select the Sensor option radio button as shown below then select the specific input being used for the HDA-8100 audio sensor trigger.
In the example below, we will choose the Base Station as the HDA-8100 and the Sensor as the Turntable device assigned in Step 2 earlier.
You will then select the ON or OFF option. Normally, you will choose the ON option for an audio sensor trigger as we want to know when the turntable audio is SENSED.
ON = when signal is sensed (turntable audio sensed)
OFF = when signal is not sensed (turntable audio not being sensed)
Click the OK button.

Step 12: You can then program the macro for when the sensor input senses audio, in this case, the turntable audio playing.
After pressing OK in the step above, you will see the macro window with the conditional variable inserted - the IF question regarding the sensor state. However, nothing is yet programmed to play below. That is detailed in the next step.
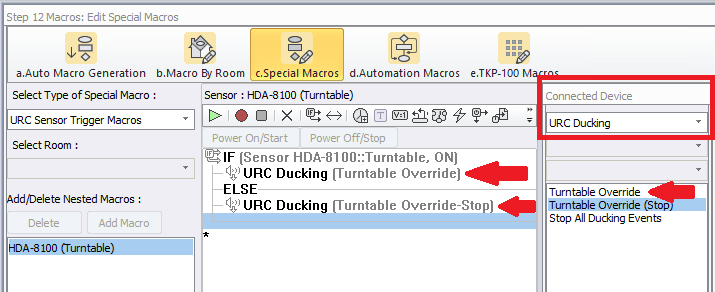
Step 13: In this step, we will insert the Turntable Override URC Ducking Event that we created in Step #7 into the conditional programming (also known as IF/ELSE programming).
The example below shows a URC Amp Ducking Event macro inserted below the IF query but above the ELSE line. This event is selected under the Connected Device column and by selecting URC Ducking in the dropdown menu. You will then see your previously created event or events. Since this is a Ducking Event, we want the system to return to the previous audio source when the turntable stops playing. To accomplish this, insert the Turntable Override (Stop) command under the ELSE section.
That’s it! If the turntable plays, it will override whatever audio is currently playing, when it’s done it will go back.
URC Sensor Testing
To test a URC sensor, use the process below:
a: Go to Accelerator Step #5 - Base Station Setup and Step #5b - Sensors.
b: Select the sensor that you want to test. It can be any device/port that has a sensor attached (the example below shows the MRX-8, sensor port #1 when using a doorbell as the input when using a URC SEN-CCLS). The process is the same regardless of the input or sensor chosen.
c: Click on the Check Sensor button. A Test Sensor window will open.
d: Use the Check button to check/update the status of the sensor.
The image below shows the sensor:
OFF = signal/contact is not sensed (doorbell released or doorbell not being pressed) or audio not sensed if we had chosen an HDA audio input (ie: turntable audio not playing)

The image below shows the sensor:
ON = signal/contact is sensed (doorbell pressed) or audio is sensed if we had chosen an HDA audio input (ie: turntable audio is playing)

Thanks to Lee Rambler for this programming scenario!
Additional Information & Resources:
Please refer to this article for the difference between a Paging Event and a Ducking Event
Please refer to this article giving a basic overview of the HDA Ducking Event and its capabilities
Please refer to this article detailing how to use using the audio sensing automation capabilities on the HDA amplifiers
You can also view the short video in the URC Video Portal titled Audio Source Automation: Create automation using HDA audio sensors utilizing a 3rd party audio source as the trigger.
To learn more about HDA products and programming, please see the HDA Programmers Guide or the Accelerator 3 online Programming Guide.
