The following article details the step-by-step process in the Accelerator 3 software for creating a URC Amp Paging Event and using it as a Doorbell alert when using a URC sensor and HDA audio. This same process can also be used when creating a driveway alert, a gate alert or any other similar HDA sound file alert when using URC sensors.
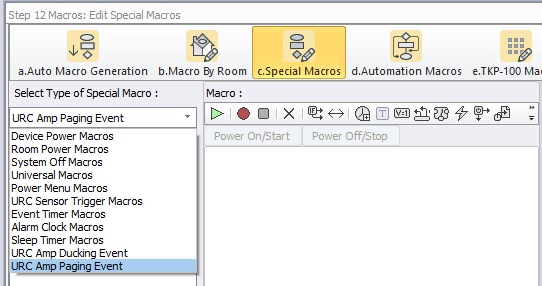
Location of Paging Event in Accelerator 3 software - Step 12c
HDA Paging Events:
- An HDA Page Event is a Macro programmed in Accelerator that is triggered by a sensor condition, an IP string or at a defined specific time
- 64 Page Events are available for programming
- A Page Event can affect any zone or zone group
- Page Events are programmed in Accelerator Step 12c, TC Flex 2 Step 10 (Special Macro)
HDA Page Event General Information:
- The most common use for a Page Event is a doorbell interrupt in a zone or multiple zones
- A Page Event can be programmed to play a Chime Sound File, a different input in a zone, or simply affect the volume of a zone
- Each Page Event has a time duration setting
- At the conclusion of a Page Event, the affected zones return to their original state prior to the start of the Page Event
- A URC Audio Sensor, Contact Closure Sensor, Magnetic Field Sensor, Light Sensor, or Voltage Sensor can trigger a Page Event, along with an IP command or a defined time
Adding a Standard Doorbell Device to Your Project
1. If you don't already have one in your My Database, you can create a "dummy" driver for the Doorbell by using the following procedure to add a "Non AV General Device" device. This "dummy" device will not have a user interface or require any control method (IR, IP, RS-232).
This device is required so that it can be assigned to a sensor input.
Note: Once this device is created, you can access and use it repeatedly without the need to create a new driver each time!
In Step #4b - Add Other Devices>Create New Driver, select "Start Blank - Device Not Found".

2. Choose the "No Commands" or "Non AV General Device" option. The No Commands option will allow you to add it as an audio source. The Non AV General Device option will only allow you to add it only as a sensor trigger.
This will create a device with no control and no buttons generated anywhere. It will appear in Two-way/Advanced Modules when selecting the Module Type. Click the Next button.

3. In this example, we created the doorbell as Brand: Misc, Model: STANDARD DOORBELL and Device Type Category: AUX.
We then saved the driver as "doorbell_standard.cd3" in the custom driver database (or whatever name you prefer).
The default file path is:
C:\Users\<insert_user_name>\Documents\Universal Remote Control, Inc\URC Accelerator 3\CustomDrv

You can also create additional drivers using the "Save As" option while the driver is open and call them "driveway alert", "gate alert" or whatever is descriptive for the sensed device. They will then appear in the same Brand location and can be added to the project as needed. Make sure to update the Project Tree Name within the new driver so that it appears properly in the Project tree (see picture below).

4. To locate and add the driver to your project, go to Step #4, select My under the Select Database section. Select Two-way/Advanced Modules under the Module Type and then select AUX under the Category section. You will then see your devices listed and can add them to your project as required.
Click the "Add Selected Modules" button to add it to your project.

Programming a Doorbell Using a URC Sensor and HDA Audio:
Step 1: The initial settings are done under Accelerator Step #5 - Base Station Setup and Step #5b - Sensors.
You will see the Standard Doorbell device listed in the room after adding it to your project as detailed above.
Pro Tip: In most situations where a standard doorbell or driveway alert needs to be sensed, you can use the URC SEN-CCLS sensor. This sensor senses if a dry switch or relay closure is open or closed. You can see the details here: https://www.urc-automation.com/product/sen-ccls/

Step 2: From the list of available devices, drag over the Standard Doorbell device to the correct port on the HDA unit and verify that URC Sensor Trigger is selected, not Power Tracking. The example below shows using the MRX-8, Sensor Port #1 as the desired sensor input location.
The available options for URC sensors are:
• Power Tracking (not used for this scenario)
• URC Sensor Trigger - This is the setting required when using the Doorbell as the "trigger"

Step 3: In Step #9f, you will need to add a doorbell sound to your project. The Accelerator program has numerous standard sounds available. Click Add and select the desired sound. You can test the sound before adding it. To add the sound to the project, highlight the sound and click OK. If you are using multiple sensors and different sounds for different doors, driveway alerts, etc., you can add them all at the same time for use later within Paging or Ducking Events.
These sounds are stored on the HDA device(s). Each HDA audio device (not the HDA-SW5) can support up to 10 sound files up to one (1) minute in length. This means that if you have two HDA audio devices, you can store up to 20 sounds (3=30, 4=40, etc).
If desired, you can also import and use sounds as described here: https://urcfaq.knowledgeowl.com/help/using-sound-and-audio-files-in-hda

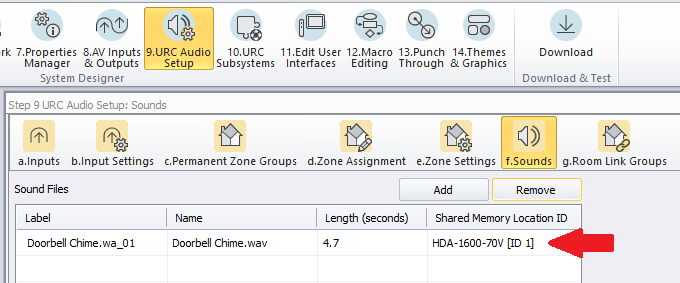
Step 4: The newly added sound file(s) will now be shown with the Shared Memory Location and ID. This is not editable. You are not able to choose which HDA the sound file gets saved to - it's done automatically (it automatically gets stored in the HDA unit that does the least. For example, the sound file would be stored in an HDA-IO over an HDA-130).
All sound files can be shared to ANY HDA audio zone in the project no matter the device they are saved on. They DO NOT need to reside on a specific HDA device to be played on that device or the entire system.
Step 5: We will now need to create the URC Amp Paging Event that will determine the volume, zones and the sound file that we want to play on a doorbell press.
Go to Accelerator Step #12c, Special Macros. On the left-side pull-down menu, select URC URC Amp Paging Event.

Step 6: Click on the Add Macro button to create the event. If you are using multiple sensors and events, make the names descriptive. For example, Front Doorbell, Rear Doorbell, Driveway Alert, Gate Alert, etc.

Step 7: Here we will add a URC Amp Paging Event and name it Front Doorbell.
There are settings that can be adjusted as desired:
a. Page Rooms/Zones: Choose the rooms and zones where you want the paging event to play
b: Zone Power Change: This setting will allow a zone to play the alert even if it is turned off
c: Volume Level: This setting allows you to set the volume level to a fixed percentage or lower or raise by a specific percentage (Note: this may require testing to get the desired volume level)
d: Volume Ramp Rate: This setting determines how long it takes the volume to ramp to the desired level
e: Play Input: This setting allows you to choose the specific sound file or input to play
f: Page Duration: This setting determines how long the paging event will last. In this example, the sound file is 4.7 seconds in length so I chose 5 seconds.
g: Volume Return Ramp Rate: This setting determines how long it takes the volume to ramp to the previous level (if applicable)
h: Force Event End: This setting forces a paging event to end on a zone off or an input change
Click OK when all setting are completed. If you need to make a change, simply double-click on the macro to reopen it, edit it and then resave.

Step 8: Now that we have created the URC Amp Paging Event, we will need to configure the sensor trigger macro.
Go to Accelerator Step #12c, Special Macros. On the left-side pull-down menu, select URC Sensor Trigger Macros.

Step 9: The unprogrammed MRX-8 trigger macro event will be listed in red (as shown below):

Step 10: In the main macro window, click on the asterisk (*) and then select the IF Statement Type button and then select the "Else" option.

Step 11: After selecting "Else", the IF Setting window will pop up asking you to select the Type of action/trigger desired. Select the Sensor option radio button as shown below then select the specific input being used for the doorbell sensor trigger.
In the example below, we will choose the Base Station as the MRX-8 and the Sensor as the Standard Doorbell device assigned in Step 2 earlier.
You will then select the ON or OFF option. Normally, you will choose the ON option for a doorbell trigger as we want to know when the doorbell is PRESSED.
ON = when signal is sensed (doorbell pressed)
OFF = when signal is not sensed (doorbell released or doorbell not being pressed)
Click the OK button.

Step 12: You can then program a macro as needed for when the sensor input senses the trigger, in this case, the press of the doorbell button.
After pressing OK in the step above, you will see the macro window with the conditional variable inserted - the IF question regarding the sensor state. However, nothing is yet programmed to play. That is detailed in the next step.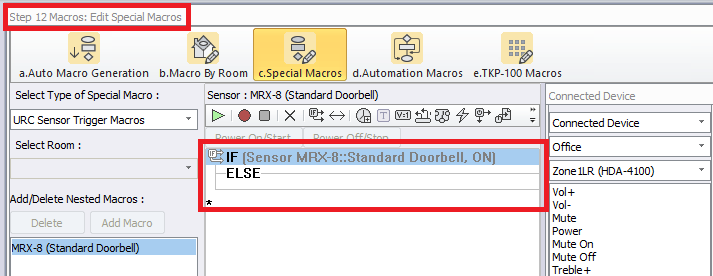
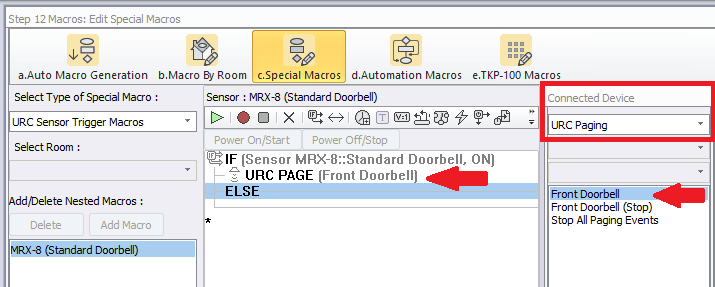
Step 13: In this step, we will insert the Front Doorbell URC Paging Event that we created in Step #7 into the conditional programming (also known as IF/ELSE programming).
The example below shows a URC Amp Paging Event macro inserted below the IF query but above the ELSE line. This event is selected under the Connected Device column and by selecting URC Paging in the dropdown menu. You will then see your previously created event or events.
URC Sensor Testing
To test a URC sensor, use the process below:
a: Go to Accelerator Step #5 - Base Station Setup and Step #5b - Sensors.
b: Select the sensor that you want to test. It can be any device that has a sensor attached (the example below shows the MRX-8, sensor port #1).
c: Click on the Check Sensor button. A Test Sensor window will open.
d: Use the Check button to check/update the status of the sensor.
The image below shows the sensor:
OFF = signal/contact is not sensed (doorbell released or doorbell not being pressed)

The image below shows the sensor:
ON = signal/contact is sensed (doorbell pressed).
Note: A doorbell is normally a momentary contact device-not always closed. This Test Sensor option may not update unless the doorbell is continuously pressed (for testing) while the Check button is pressed.

Additional Information & Resources:
Please refer to this article for the difference between a Paging Event and a Ducking Event
Please refer to this article giving a basic overview of the HDA Ducking Event and its capabilities
Please refer to this article detailing how to use using the audio sensing automation capabilities on the HDA amplifiers
You can also view the short video in the URC Video Portal titled Audio Source Automation: Create automation using HDA audio sensors utilizing a 3rd party audio source as the trigger.
To learn more about HDA products and programming, please see the HDA Programmers Guide or the Accelerator 3 online Programming Guide.
