URC HDA devices and software provide countless options to configure and optimize audio settings to achieve performance and flexibility for almost any application.
In most cases, the URC HDA-SW5 switch capacity is sufficient for most installations. However, if additional AVB ports are required the
L-Acoustics LS10 AVB Network Switches can be used in a URC HDA audio system.
The following article details the required settings needed to use the L-Acoustics LS10 AVB Network Switches with URC HDA Audio.
The L-Acoustics LS10 Network Switch is an AVB-enabled switch that supports eight RJ45 ports and two SFP network ports for AVB streamed over fiber.
This short guide defines the required settings needed to use the L-Acoustics LS10 Network Switch with HDA Audio. This guide was written to get you started with using this switch with URC HDA Audio. Any other custom settings you set or change in L-Acoustics LS10 Switch are up to you and may affect the performance of HDA Audio.
*The L-Acoustics LS10 AVB Network Switch is NOT compatible with the URC HDA-SW5 AVB Network Switch.
Note: Tested with HDA firmware v1492 (minimum required), testing with L-Acoustics LS10 firmware version 2.11.7.6 (minimum required).
The L-Acoustics LS10 Setup Software (L-Acoustics Network Manager) can be found here.
L-Acoustics LS10 Network Switch User Manual can be found here.
L-Acoustics LS10 Network Switch Setup
(Starting with a factory default LS10 switch)
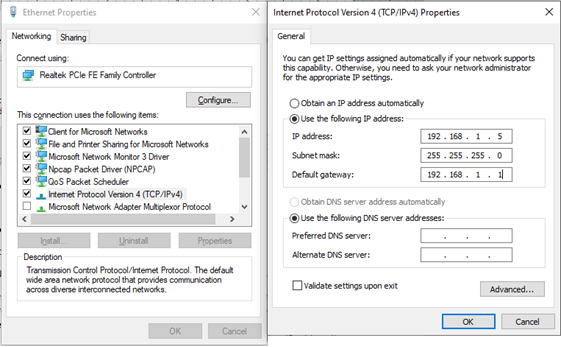
1. Set the IPv4 of your PC to “192.168.1.5” in the networks settings for your Ethernet adapter.
2. Using one of the LS10 RJ45 ports, connect the LS10 switch to your PC’s Ethernet port.
3. Open the L-Acoustics Network Manager software.
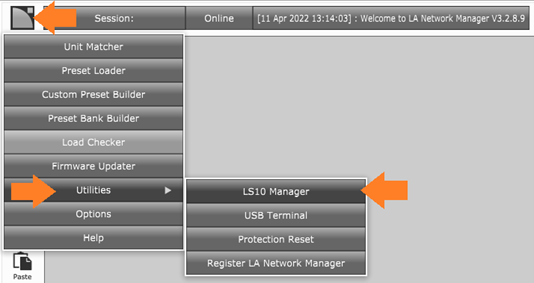
4. Open the “LS10” Manager.
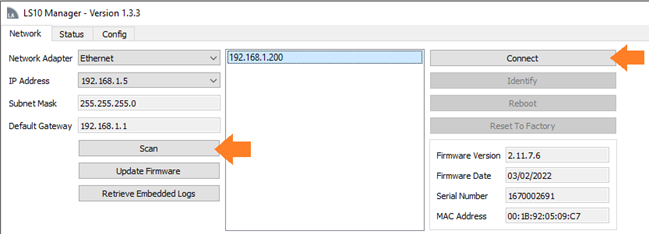
5. Click “Scan”. A factory default LS10 switch will appear with the IP address “192.168.1.200”. Click on this device and select “Connect”.
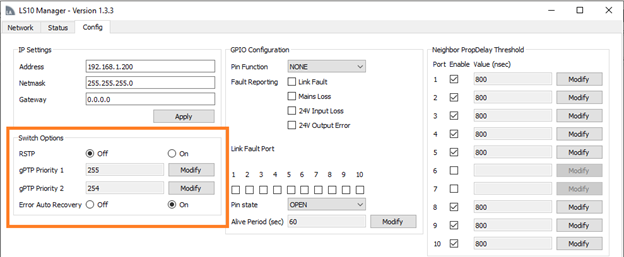
6. Click on the “Config” tab. The LS10 switch requires that a Static IP is set for the switch.
Enter the desired Static IP. You are required to set a DHCP range in your router that is outside of any Static IP addresses set for the LS10 switches in your installation. Also set the Netmask and Gateway as it corresponds to the network settings in your router.

7. In the “Config” tab, set the following settings in the “Switch Options” section:
RSTP = Off
gPTP Priority 1 = 255
gPTP Priority 2 = 254
Error Auto Recovery = On
8. Disconnect the LS10 switch from your PC’s Ethernet port.
Reboot the LS10 switch.
Connect the LS10 switch(es) to your network router.
LS10 switch setup is now complete.
SFP Ports
The SFP ports of the LS10 switch were tested using a Fiber adapter and a 50m fiber optic cable connecting two LS10 switches. No issues were found using this configuration.
SFP RJ45 adapters were also tested with an 8m Cat5e cable. No issues were found using this configuration.
SFP adapters used for these tests:
10Gtek Fiber SFP Adapters – product information can be found here.
10Gtek RJ45 SFP Adapters – product information can be found here.
Additional Information & Resources:
The L-Acoustics LS10 Setup Software (L-Acoustics Network Manager) can be found here.
L-Acoustics LS10 Network Switch User Manual can be found here.
More information on using third-party AVB network switches can be found here.
More information on using Netgear AVB network switches can be found here.
More information on using PreSonus AVB network switches can be found here.
More information on using Luminex Gigacore AVB network switches can be found here.
To learn more about HDA products and programming, please see the HDA Programmers Guide or the Accelerator 3 online Programming Guide.
