URC HDA devices and software provide countless options to configure and optimize audio settings to achieve performance and flexibility for almost any application.
In most cases, the URC HDA-SW5 switch capacity is sufficient for most installations. However, if additional AVB ports are required the Luminex Gigacore 10 Network Switch can be used in a URC HDA audio system.
The following article details the required settings needed to use the Luminex Gigacore 10 Network Switch with URC HDA Audio.
The Luminex Gigacore 10 Network Switch is an AVB-enabled switch that supports eight (8) RJ45 ports and two fiber network ports. The Luminex Gigacore 10 Network Switch can be used with multiple URC HDA-SW5 AVB Switches in an installation.
The Luminex Gigacore 10 setup screens offer more adjustable settings than shown in this guide. This guide was written to get you started with using this switch with URC HDA Audio, and any other custom settings you set or change in the Gigacore 10 Switch are up to you and may affect the performance of HDA Audio.
Note: Tested with HDA firmware v1369 (minimum required), HDA-SW5 Firmware v145 (minimum required).

Luminex Gigacore 10 Network Switch Setup: (Starting with a factory default switch connected to your router)
Connect your HDA devices to the Gigacore switch.
Every GigaCore switch embeds a built-in web server, which excludes the need of a dedicated application to configure the unit. Browsers such as Chrome, Internet Explorer (IE9 minimum), Firefox or Safari can be used to reach the web server. Every unit comes with a default IP address, visible at the rear of the unit. Set your computer with an IP address within the same subnet (do not use the same IP address!).
Example 1:
Switch IP address: 192.168.1.1, Netmask: 255.255.255.0
Computer IP address: 192.168.1.2, Netmask: 255.255.255.0
Example 2:
Switch IP address: 192.168.2.112, Netmask: 255.255.0.0
Computer IP address: 192.168.2.113, Netmask: 255.255.0.0
Connect your computer to the switch with a network cable and launch your favorite web browser. Type the IP address of the switch in the address field, and press enter. You will be prompted to enter a login.
Use admin in the user field and leave the password field blank. This takes you to the status page of the GigaCore switch as shown below:
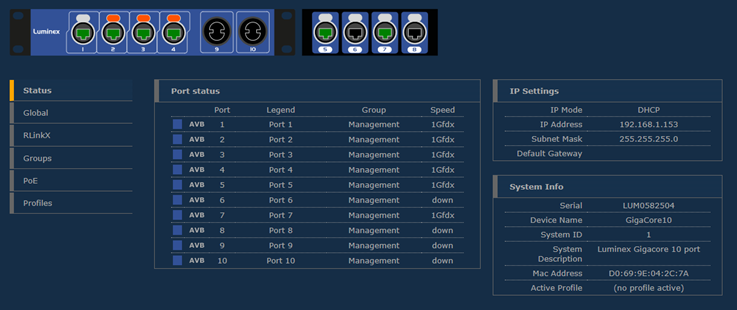
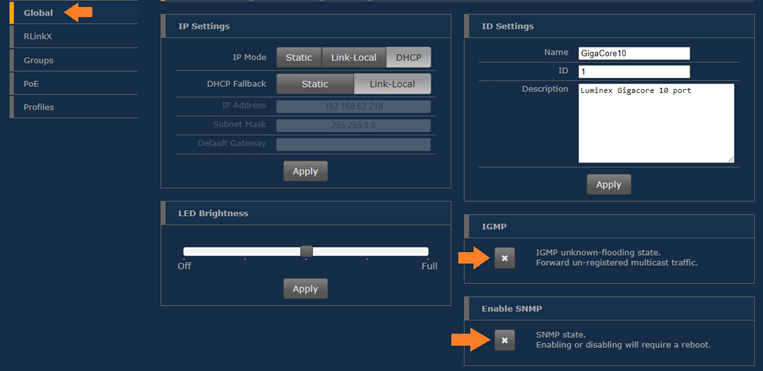
1. Click on “Global”, set IGMP and Enable SNMP to the values shown below:

On the same page, set your IP settings to “DHCP” and “Link Local”:
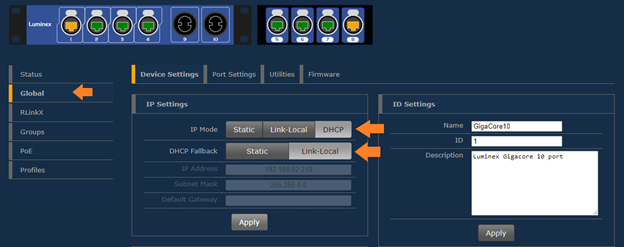
Click “Apply”. The Gigacore switch will set to DHCP. Identify the Gigacore switch IP in your router settings and enter that IP address into your browser navigation bar to return to the Gigacore Switch setup menu.
2. Select “Groups”, “1 Management”:
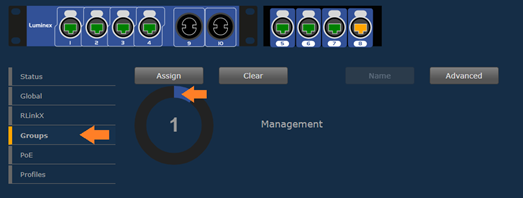
Click on the ports in the switch image that have HDA Audio Devices attached to it, along with the port that connects the Gigacore Switch to your router:

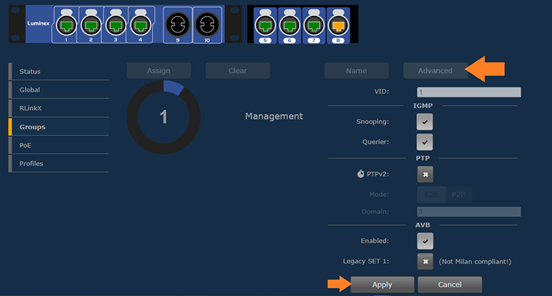
Select “Advanced” and enter the settings shown below to enable AVB then Click “Apply”:
3. PoE Setup - Click “PoE”, “Settings”:
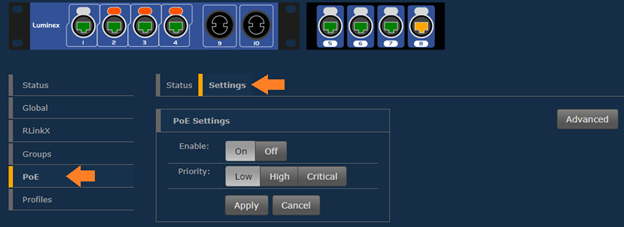
For an HDA-130, click on the image of the port that the HDA-130 is connected to. Set the PoE settings as shown in the below image: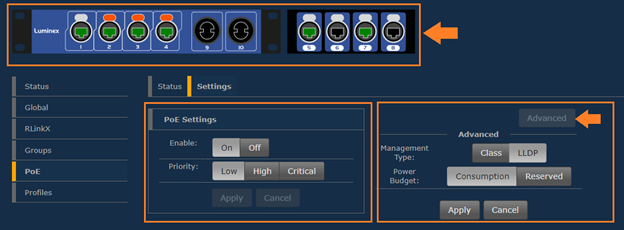
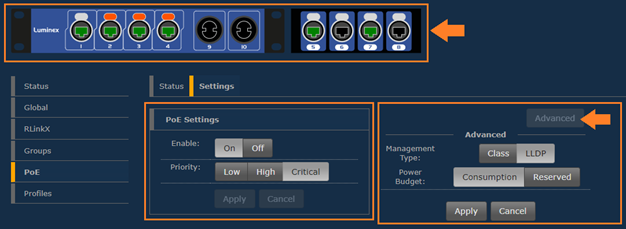
For HDA-IO, click on the image of the port that the HDA-IO is connected to. Set the PoE settings as shown in the below image:
4. IGMP, SNMP – These settings should be disabled.
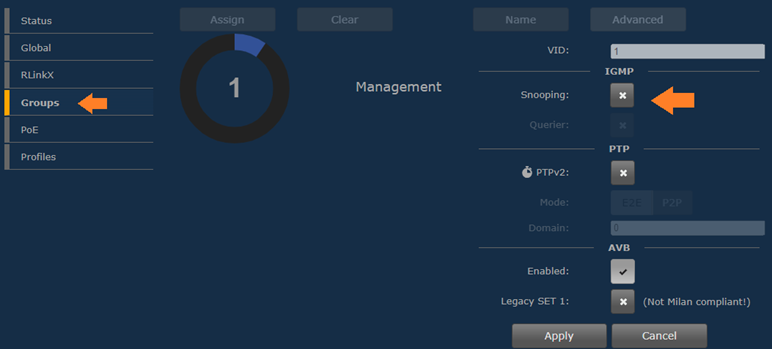
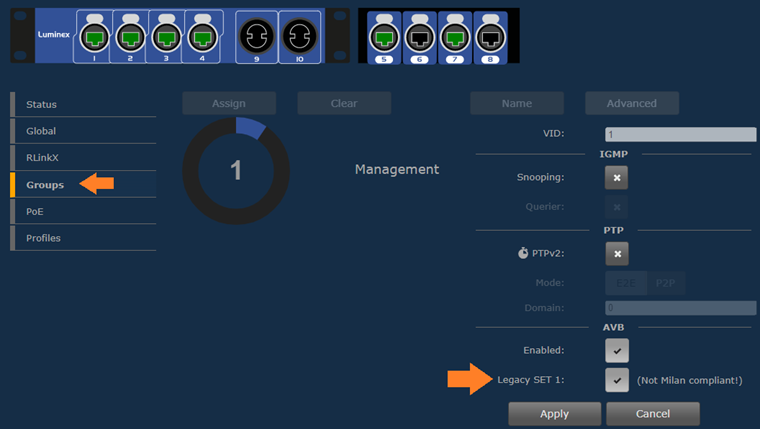
5. “OPTIONAL” Legacy SET 1: – HDA Audio seems to work without any issue when this setting is enabled.
Your results may vary though. Adjust this setting if experiencing an issue.
Additional Information & Resources:
More information on Luminex Gigacore switches can be found here.
Luminex Gigacore 10 Network Switch User Manual can be found here.
More information on using third-party AVB network switches can be found here.
More information on using Netgear AVB network switches can be found here.
More information on using PreSonus AVB network switches can be found here.
More information on using L-Acoustics AVB network switches can be found here.
To learn more about HDA products and programming, please see the HDA Programmers Guide or the Accelerator 3 online Programming Guide.
