URC HDA devices and software provide countless options to configure and optimize audio settings to achieve performance and flexibility for almost any application.
This article provides a better understanding when using the Analog Inputs on the HDA devices and details the procedure for configuring them when using Accelerator 3 or TC Flex 2 software.
HDA Analog Inputs Configuration
The HDA-8100 has eight (8) Analog Inputs for use when connecting a variety of unbalanced audio devices.
The HDA-4100 has four (4) Analog Inputs for use when connecting a variety of unbalanced audio devices.
The HDA-1600 has four (4) Analog Inputs for use when connecting a variety of unbalanced audio devices.
The HDA-130 has one (1) Analog Input for use when connecting a variety of unbalanced audio devices.
The HDA-IO has one (1) Analog Input for use when connecting a variety of unbalanced audio devices.
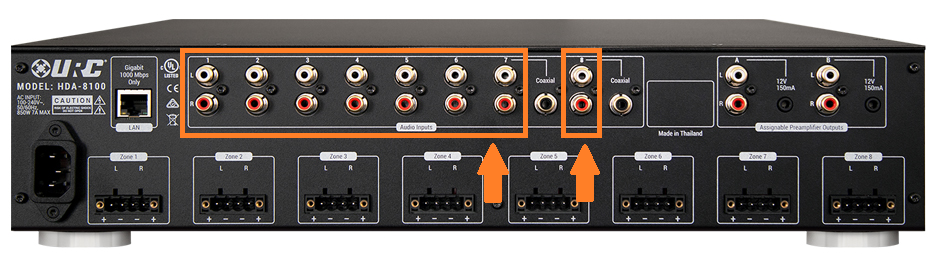
HDA-8100 - Analog Inputs on Rear Panel:
The HDA-8100 has eight (8) Analog Inputs and two (2) digital inputs. Only one (1) digital input can be used.
Please refer to this article for more information: https://urcfaq.knowledgeowl.com/help/hda-8100-coax-digital-inputs
Verify That No Digital Inputs Are Selected in Software Configuration
When using the analog inputs 7 and/or 8 on the HDA-8100, verify that there are no digital inputs selected in the software settings under the Device Properties. If you attempt to use the analog inputs and digital inputs are selected, the desired analog input will not function at all.
This is set in Accelerator 3 and TC Flex 2 in Step 7: Properties Manager. For the HDA-8100 device in the Device Properties, you can adjust the Coaxial Digital Input to None, Input 7 or Input 8.
When you require use of the analog inputs 7 or 8, do not select Coaxial Digital Input : Enable for 7 or 8, select "None" (see pic below)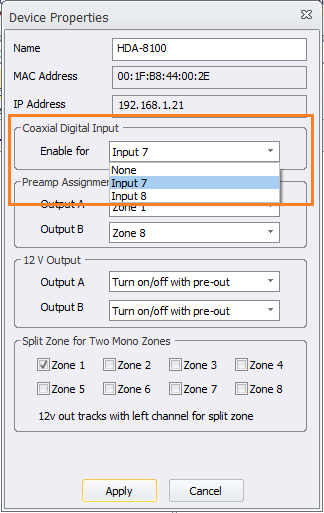
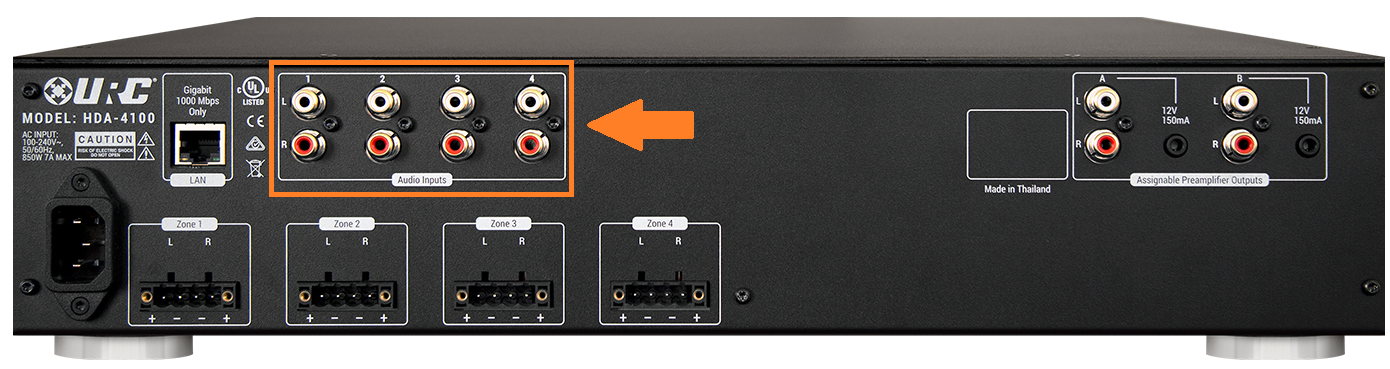
HDA-4100 - Analog Inputs on Rear Panel:
The HDA-4100 has four (4) Analog Inputs and no digital inputs. No configuration is required other than the input assignment(s) in Step #9a.
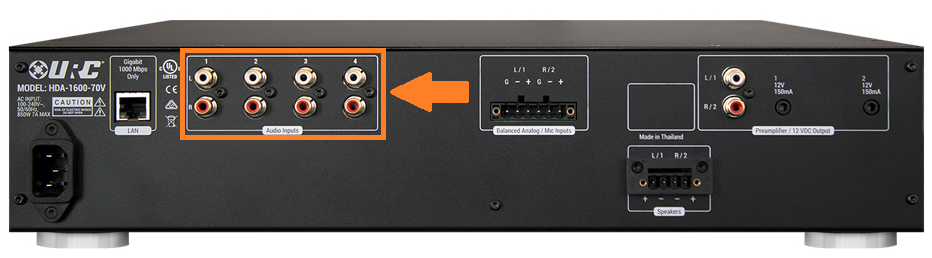
HDA-1600 - Analog Inputs on Rear Panel:
The HDA-4100 has four (4) Analog Inputs and no digital inputs. No configuration is required for the analog inputs other than the input assignment(s) in Step #9a.
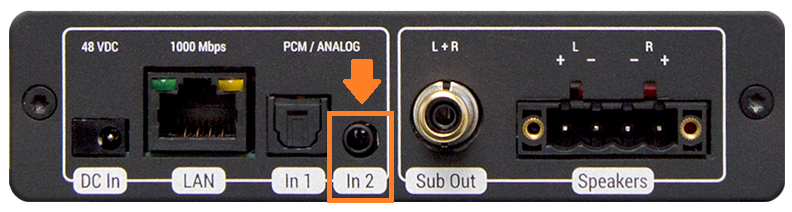
HDA-130 - Analog Input on Rear Panel:
The HDA-130 has one(1) Analog Input and one(1) digital input. Both can be assigned to different devices and used as separate inputs. No configuration is required other than the assignment in Step #9a. Note that the analog input is listed/assigned as Input 2. The digital input is listed/assigned as Input 1.
HDA-IO - Analog Input on Rear Panel:
The HDA-IO supports one (1) analog input or one (1) digital input (either coaxial or Toslink optical). One of these inputs can be used in the system when the HDA-IO is being used as an input device, as a “stream injector”.
Please refer to this article for more information: https://urcfaq.knowledgeowl.com/help/understanding-the-hda-io-analog-input
Input assignment(s) in Step #9a are required.

Verify That No Digital Inputs Are Selected in Software Configuration
- When using the analog input on the HDA-IO, verify that there are no digital inputs selected in the software settings under the Device Properties. If you attempt to use the analog inputs and digital inputs are selected, the desired analog input will not function at all.
This is set in Accelerator 3 and TC Flex 2 in Step 7: Properties Manager. For the HDA-IO device in the Device Properties, you can adjust the Coaxial Digital Input to Coaxial Digital, Optical Digital or Analog.
When you require use of the analog input, do not select Coaxial Digital or Optical Digital, select "Analog" (see pic below):

Additional Information & Resources:
Please refer to this article for additional details on using the HDA-IO digital inputs.
Please refer to this article for additional details on using the HDA-IO analog inputs.
Please refer to this article for additional details when using the HDA-8100 coaxial digital inputs.
Please refer to this article for additional details on adjusting the HDA input levels.
To learn more about HDA products and programming, please see the HDA Programmers Guide or the Accelerator 3 online Programming Guide.
